How do i clean makeup sponges

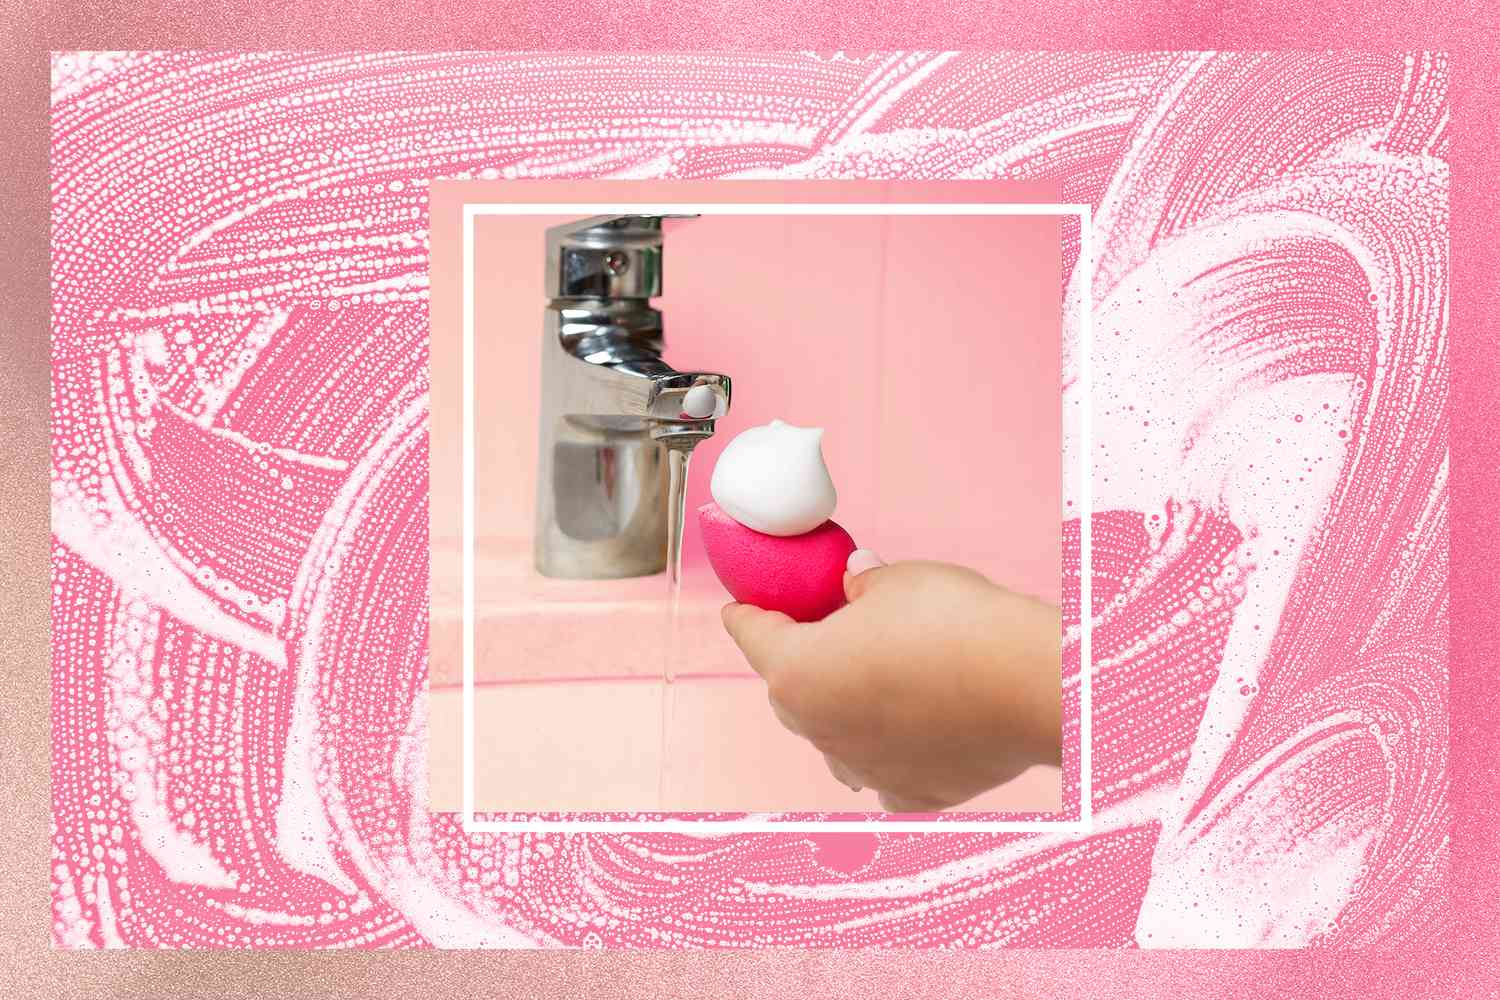
First off, rinse your sponge under warm water. Just like a gentle waterfall, let the water flow over it. This initial rinse helps to remove excess makeup. Then, grab some mild soap or a gentle cleanser—think of it as your sponge’s shampoo. You can use dish soap, baby shampoo, or even a dedicated sponge cleanser if you have one. Now, pour a small amount into your palm or a bowl, and start lathering up that sponge.
- Say Goodbye to Bacteria: The Ultimate Guide to Cleaning Your Makeup Sponges!
- From Grimy to Gleaming: Effective Techniques for Reviving Your Makeup Sponges
- Makeup Sponges 101: Why Cleaning Them is Essential for Your Skin Health
- The Quick and Easy Routine: How to Clean Your Makeup Sponge in Under 5 Minutes!
- Your Step-by-Step Guide to Transforming Dirty Makeup Sponges into Like-New Tools
Pop quiz: when was the last time you actually paid attention to those nooks and crannies? They can harbor all sorts of nasties if you don’t give them some love! So, squeeze and knead your sponge gently; it’s all about making that foam work for you. Rinse thoroughly until the water runs clear. It’s a little like watching a dirty car go through a wash cycle—satisfying, isn’t it?
Still see some stubborn stains? No worries! You can use a bit of olive oil mixed with your soap; think of it as the double duty cleaner. Just remember, be gentle with it! After rinsing your sponge one last time, gently squeeze it to remove excess water—no twisting or wringing, or you might end up with a sad, squished sponge.
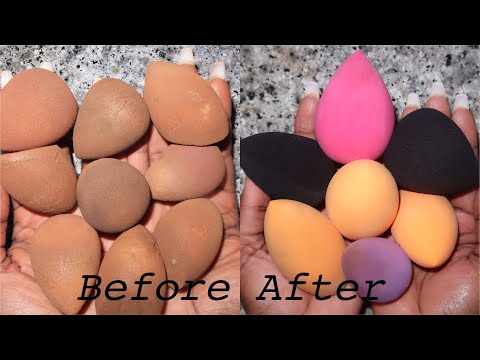
Lastly, allow it to air dry in a clean, well-ventilated spot. Think of it like hang drying your favorite sweater—no heat, just a little patience and it’s good as new! With just a bit of routine, your sponges will stay clean, and your makeup will look flawless!
Say Goodbye to Bacteria: The Ultimate Guide to Cleaning Your Makeup Sponges!
First off, let’s chat about why cleaning your makeup sponge is so crucial. Think of your sponge as a sponge for bacteria. If you don’t clean it regularly, every time you dab it on your skin, you’re basically transferring a cocktail of germs, oils, and dead skin cells. Yuck, right? Nobody wants unexpected breakouts or skin irritation. Just like you wouldn’t wear the same dirty socks every day, your sponge needs some TLC too.
So, what’s the magic formula? It’s as simple as mix – a few drops of gentle dish soap or baby shampoo with warm water. Soak your sponge in this concoction for a few minutes, then gently squeeze and massage to work out all that grime. Rinse it under warm running water until the water runs clear. Voila! You’ve just given your makeup sponge a spa day.
But wait, there’s more! Don’t just stop there. Make it a habit to clean those sponges every week. Treat it like a beauty ritual, like doing your nails or a face mask—but with a tool that literally touches your face. Think of it as giving your skin a favor. And trust me, your future self will thank you for it every time you glide on your makeup with a fresh, clean sponge—no bacteria, just beauty!

From Grimy to Gleaming: Effective Techniques for Reviving Your Makeup Sponges
First off, let’s chat about the power of a good soak. Imagine your sponge after being submerged in a gentle cleansing solution; it’s like giving your sponge a warm bubble bath! Start by filling a bowl with warm water and a splash of mild soap. Dunk your sponge in and let it soak for about 10-15 minutes. This allows the makeup residue to loosen up, so scrubbing it later feels like a walk in the park.
Next up, the magic of gentle squeezing! Just like squeezing a stress ball, this method helps to push the dirt out while keeping your sponge intact. Rinse under running water, and you’ll notice the color of the water changing—it’s satisfying to watch those makeup remnants disappear!
If your sponges are looking particularly rebellious, consider a bit of dish soap or a splash of olive oil mixed with soap. It’s kind of like using a secret weapon against stubborn stains. A little goes a long way—just a pea-sized amount should do the trick!
For an extra layer of cleanliness, toss your sponges in the microwave—yes, you heard that right! Put your damp sponge in a microwave-safe bowl with water and blast it for about a minute. This not only helps in disinfecting but also makes your beauty tool feel brand new.

Makeup Sponges 101: Why Cleaning Them is Essential for Your Skin Health
Imagine your sponge as a sponge in the kitchen. If you leave it dirty, it starts to smell and harbor all sorts of nasty germs. Your facial skin is no different! When you continuously use a dirty sponge, you’re not only risking breakouts and irritation, but you might also be sabotaging your beautiful glow. Picture managing a garden; if you neglect the weeds, your flowers won’t flourish. Similarly, a clean sponge is essential for your skin’s health.
Moreover, each time you pop that sponge back into your makeup bag, do you know what you’re doing? You’re inviting in a party of germs. Cleaning your makeup sponge regularly—ideally after every use—means fewer clogged pores, fewer flare-ups, and a smoother application. You wouldn’t use a filthy paintbrush on a canvas, would you? Your skin deserves better!
Now, what’s the best way to clean these little guys? A gentle cleanser with warm water will do wonders. Just give it a nice squeeze and swirl it around, and voila! Your sponges are back to being the pristine, effective tools they were meant to be. Trust me, your skin will thank you, and your makeup will look fresher than ever. So, let’s keep those sponges clean and let your true beauty shine through!

The Quick and Easy Routine: How to Clean Your Makeup Sponge in Under 5 Minutes!
First off, grab your sponge and head to the sink. Warm water and a gentle cleanser (like baby shampoo or a dish soap) are your best pals here. Now, how about a little analogy? Picture your sponge as that one friend who just can’t handle a wild night out—they need a little TLC to bounce back!
Start by running the sponge under warm water. This helps to open up those porous fibers, making it easier to escape the makeup residue trapped inside. Next, squirt a dime-sized drop of your chosen cleanser right onto it. Think of it as giving your sponge a refreshing massage—softening it up while loosening all that caked-on makeup.
Now here comes the fun part: gently squeeze and knead the sponge. Do you remember how satisfying it feels to squish playdough between your fingers? That’s the energy we want! Keep squeezing under the water until you see all that dirt swirl down the drain. If your sponge still looks a bit like it went to battle, don’t hesitate to repeat the process.
Once it’s all clean, rinse it thoroughly. Let the warm water wash away any remaining soap like a mini spa day for your sponge! Finally, give it a gentle squeeze to remove excess water and place it on a clean towel to dry. Easy peasy, right? In just a few minutes, you’ve transformed your makeup sponge from a hidden germ hub to a fresh, ready-to-use beauty tool!
Your Step-by-Step Guide to Transforming Dirty Makeup Sponges into Like-New Tools
First off, gather your supplies. You’ll need some gentle soap, like baby shampoo or a mild dish soap, a bowl or sink, and warm water. Think of it as prepping for a mini beauty spa day! Now, soak your sponge for a few minutes in warm water—that’s right, let it soak up all the goodness. This softens the makeup and makes it much easier to remove.
Next, add a few drops of your chosen soap directly onto the sponge. Picture it like giving your sponge a bubble bath! Start to gently squeeze and massage the soap into the sponge. You’ll notice the makeup gradually releasing—like watching a flower bloom. Keep rinsing and repeating until the water runs clear.
If you encounter any stubborn stains, don’t fret! Applying a bit of olive oil can work wonders. Just a dab will do, and it helps break down those tough pigments. Once you’ve rinsed thoroughly, reshape your sponge and lay it flat to dry. Avoid standing it up, as this could lead to mold or a misshapen sponge.
#How do i clean makeup sponges